The Rembrandt Teaching Project
Teaching Guide Lesson Plan
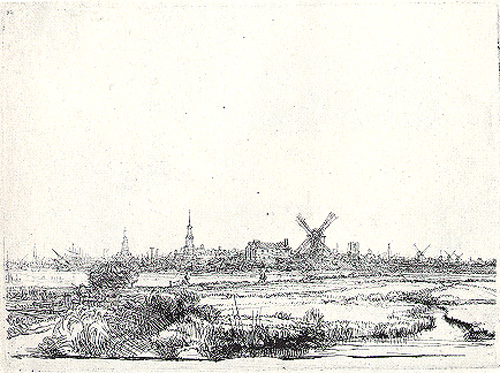
A View of Amsterdam
Details of the Work
Title: View of Amsterdam (c. 1640)
Size: 4 1/2 x 6 in (11.3 x 15.4 cm)
Medium: Etching (only state)
Location: Museum het Rembrandthuis, Amsterdam
Lesson Preview
This lesson gives students a geographical sense of place, speaking about
Rembrandt in the context of the city of Amsterdam. It also introduces
the artistic medium of the etching and discusses Rembrandts mastery of
the form.
 |
Background of the Work
Around the year 1630, coinciding with Rembrandts arrival, Amsterdam was
at the beginning of its heyday. It was a highly prosperous, rapidly growing
commercial center reflecting Hollands central role in world trade. Its
population was approximately 150,000 people, many of whom had settled
there because of a desire to participate in its commerce. The harbor
was full of ships from all parts of the world bringing to Amsterdam exotic
cargoes of food, clothing and household materials. Buildings were being
constructed throughout the city to accommodate the rapid influx of people.
In addition to its cosmo-politan character, Amsterdam was also a seat
of learning and culture. Universities and other centers of education
were being founded. Most fortunate for Rembrandt, there were enough people
in Amsterdam who were interested in studying painting
and acquiring art. This helped it to become one of the most important artistic
hubs in Europe.
Description of the Work
The drypoint etching of Amsterdam depicts the city as it appeared during
Rembrandts time. This view of Amsterdam was attained by walking in a
northeasterly direction from Rembrandts home until one reached the outermost
bulwark of Amsterdam. Across the surrounding meadows, from left to right,
the following structures are seen:
the Haringpakkerstoren, the Oude Kerk (Old Church),Montelbaarnstoren, which
Rembrandt was to draw later, the warehouses of the East and West India Companies,
the windmill on the Rijzenhoofd and finally the Zuiderkerk.
SUGGESTIONS FOR INSTRUCTION
Introducing the Lesson
Teacher begins by explaining the process of etching during Rembrandts
time.
The Etching: The art of etching was very popular during Rembrandts
time. An etching was made by waxing a copper plate and then drawing
directly
with a sharp needle into the waxed ground. The plate was then immersed
in a corrosive acid which ate into the metal exposed by the etched
lines not covered by wax. By controlling the length of time acid
remains on the
plate, the artist is able to control the fineness and/or depth
of the lines. A few minutes immersion was sufficient to etch
the drawing
onto
the plate.
The plate was then washed to remove all traces of acid inked with
a roller and held over a special stove. Heating the plate ensured
the
ink penetrated
right into the etched lines. The plate was wiped with a clean cloth
allowing ink to remain only in the etched grooves. The plate was
then placed on
the bed of a press which moved between the machines rollers. A
sheet of moistened paper was laid on the plate and covered with
a felt
blanket. When the press wheel turned, the entire package of bed,
plate, paper
and
blanket passed between the two rollers. Under intense pressure,
the damp paper was forced into the etched grooves absorbing all
the ink.
The artists
usually examined the result and generally the procedure was repeated
several times. Usually, one plate was used to make many copies
that were signed
and numbered by the artist. Etching allowed these multiple copies
to be made and widely distributed serving to publicize the work
of the
artist.
Because prints were relatively cheap, they were found in many Dutch
homes. They tended to be the preferred medium because prints were
used on such
items as calendars and traditional stories. It was only a short
while before these etchings were used to produce illustrated
periodicals,
forerunners
of the modern newspaper. [The teacher may wish to stress both the
composition of etching and how the process of etching developed.
Students should
be instructed to observe the etching carefully and comment on its
overall appearance noting how it differs from a painting.]
1. Developing the Lesson
Display View of Amsterdam. Some questions for discussion may include the
following:
(1). What do you see in this etching? How is it different from a painting?
(2). How would this work be classified as a portrait, landscape, or history
picture? Support your opinion.
(3). What are some structures depicted in the drawing? What are some geometric
shapes that are seen as parts of these structures?
(4). Identify clues this etching gives you about a part of the city of
Amsterdam.
(5). What can you infer about life in Rem- brandts Amsterdam from this
etching? Is there any emotion shown in the drawing? Is there a mood about
Amsterdam created?
(6). Are there are people in the drawing? If so, describe them. Are they
important to the work? Why?
(7). What inferences can be made about the following by observing Life
in Amsterdam: Jobs, the Environment, Trade, Architecture, Transportation.
(8). Based upon this etching, would you like to have lived in the Amsterdam
of Rembrandt? Why or why not?
2. Extending the Lesson
(1). The Amsterdam of 1630 was a unique architectural environment. The city planner
and architect was named Hendrick de Keyser, who designed the characteristic
red-brick Dutch houses with sandstone decorations and elaborate gables. Show
some of these types of homes to students and have them attempt to create a
Dutch cityscape of the seventeenth century to scale. (Art Production)
(2). Take a walk around your own neighborhood and create a photo essay of what
is observed. (Art Production)
Have the students first define and then demonstrate perspective. Examine the etching in terms of perspective. Observe the work in detail. What kind of perspective do you see? How is each structure drawn? What is the role of scale in this work? How tall are the structures? Are they each the same height? Why or why not?
The Holland of Rembrandts time was an interesting place politically. Before Rembrandt was born, Belgium, Luxembourg and Holland were one country known as The Netherlands ruled by the King of Spain. In 1579, the country was split into two with the southern part remaining under Spanish rule and the northern part, now called Holland, breaking away to rule itself. The leader of the Dutch republic was called the stadtholder. The stadtholder during the time of Rembrandt was Prince Frederick Henry.